Friday, August 30, 2013

Mega Matcha Addiction

My friend Eva recently blogged about a secret drink at Starbucks that is super healthy, tastes good, and costs under a buck.  When I first read her post, I thought it had to be too good to be true.  No way can you order a venti anything at Starbucks for that cheap.  I set out to my nearest store to try it out, and, low and behold, she was right!  This drink really is amazing!

So, on to the details.  The drink is called a Venti Matcha on ice.  You simply ask for three scoops of matcha powder (they use this to make their green tea lattes) mixed with water.  You'll end up with a big green refreshing beverage that tastes a lot like iced tea.  The reason it's so cheap is that they do not offer matcha as a stand alone item on the menu, so instead they just charge for an ice water and then hit the "add matcha" button.  The up-charge at my store is a whopping $.84! You can add in some sweetener or milk if you like (just wait to pour the milk in at the condiment bar so you don't get charged extra), but it is pretty delicious on it's own.
So what makes it so much healthier than green tea?  Well, when you drink matcha, you actually ingest the whole ground up tea leaf as opposed to just the brewed water.  It contains lots of trace elements and is rich in catechin polyphenols.  These compounds contain powerful antioxidants that help prevent cancer, heart disease, and slow the aging process.  It also contains fiber and almost no calories!

I read recently that, in order to ingest enough of the catechin compounds to actually benefit your health, you would have to drink at least three glasses of green tea per day.  Well, I like green tea as much as the next person, but there's no way I am going to squeeze in that many cups on a regular basis.  Fortunately, just one glass of matcha is equivalent to TEN glasses of green tea in terms of it's health benefits and antioxidant content.  Now it is easy for me to get more than enough of these antioxidants on a regular basis.

Needless to say, Eva and I are both hooked on these drinks!
But at least our addiction isn't breaking the bank!

Wednesday, August 28, 2013

Tasty Tempeh

If tempeh isn't a regular part of your diet, you are missing out!  Tempeh is made from cooked and slightly fermented soybeans that are formed into a firm patty, sometimes with additional whole grains and spices added in.  I prefer tempeh over tofu because it has lots more protein, fiber, and vitamins, and it is ready to go right out of the package.  You don't have to deal with the annoying process of pressing and draining the excess water like you do with tofu.  The flavor is slightly nutty and very mild, so it can be doctored up in all sorts of fun ways.
One of my favorite ways to prepare tempeh as of late is to cut it into thin strips and let it sit in a spicy maple marinade.  Then, I brown it in a bit of olive oil and eat up!  The result tastes a little like bacon, only BETTER (in my opinion)!
I could definitely eat this stuff straight out of the pan, but it also makes an awesome addition to a sandwich, salad, or "big bowl."  
Last night, we enjoyed it with baby kale, black beans, hummus, avocado, tomatoes, cucumbers, pickles, multigrain chips, and drizzled with organic ranch.  I can't even tell you how AMAZING it was!  Meat and cheese were definitely not missed in the least.  

Here's how you can fry up your very own tempeh "bacon:"

Cut a package of tempeh into thin strips - as thin as you can without it falling apart.  Lay the pieces in a single layer on plate or dish.

Wisk together equal parts maple syrup, liquid aminos or soy sauce, and olive oil (just enough to coat the tempeh).  Season with cayenne pepper, garlic powder, paprika, salt, and pepper to your liking.  You can also add in a squeeze of liquid smoke and/or hot sauce (I use Sriracha...it really gives it a kick!). Pour the marinade over the tempeh. 

Allow the tempeh to marinate for as long as you can...anywhere from 15 minutes to a day or more (in the fridge).  The longer it sits, the more flavor it will absorb.  I've never planned ahead enough to let it sit much more than 30 minutes or so, but it is still delicious nonetheless.  I can only imagine how flavorful it would be after marinating for hours!

Heat some olive oil in a skillet on medium-high heat. Lay the tempeh in the skillet in a single layer.  Allow it to cook for 2 minutes or so...until brown but not burned.  Flip and cook for a couple more minutes on the other side.  

Remove from heat and enjoy!!

Friday, August 23, 2013

Avocado Green Pea Pesto

I love pesto and I REALLY love avocados, so last night I decided it would be a brilliant idea to combine the two together.  I had seen some avocado pasta recipes floating around the Pinterest world, but most of them didn't seem hearty enough to serve as a stand-alone meal.  Since I wasn't going to be adding meat or cheese, I wanted to create a sauce that was super thick and filling.  I ended up pulling some elements from the avocado recipes I found online and merging them with a satisfying green pea pesto recipe I've used in the past.  I tossed in some fresh cherry tomatoes from our garden at the end, and the result was a delicious Italian-meets-guacamole masterpiece.

I didn't exactly measure everything out, but here is my best guess at the recipe:

1/4 cup olive oil
3 cloves garlic
1/4 cup walnuts
3/4 cup fresh basil
1/2 cup green peas (thaw first if you use frozen)
1 avocado
Juice of 1 lemon
Salt, pepper, red pepper flakes to taste

Blend all ingredients in a food processor and toss with the pasta of your choice!  You could also add in additional veggies or meat and/or top with fresh Parmesan to mix things up.  

A word of warning...if you try to save any leftovers, they may not look so appetizing the next day.  I brought some to work this morning and found it to be quite an unpleasant shade of brown by the time I opened up my Pyrex at lunch time.  Fortunately it it tasted better than it looked!

Wednesday, August 21, 2013

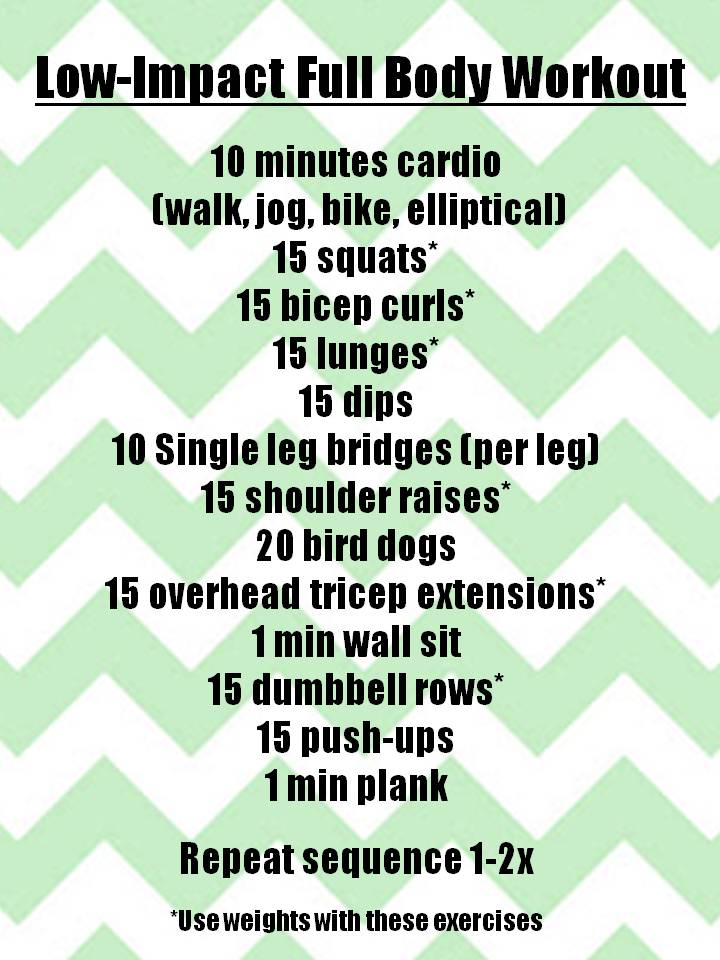
A Full Body Workout

My mom recently joined my gym, and we have had a lot of fun exercising together.  We met pretty regularly over the summer, and setting an exercise date definitely encouraged me to go on days that I might have skipped otherwise.  I hope that we can continue to meet during the school year...a workout buddy always makes the gym more enjoyable!

Since my mom didn't have much experience using weights, and I was still  in recovery mode from surgery, I put together a low-impact workout for us to do together that wouldn't be too overly strenuous.  Now that we're both getting stronger, we have tried some other workouts (I have a whole Pinterest board that I love to go to for inspiration), but we keep finding ourselves drawn back to this original one that I made.  By upping the weight and extending the times on the holds, it actually provides quite a challenging full body workout for any level.  And starting off with cardio really keeps the heart pumping!  Enjoy!


Monday, August 19, 2013

Healthy Meals in Minutes

I always hear people on diets talking about all the foods they can't have, like carbs, sweets, fast food, etc.  Rather than focusing on the foods I am trying to avoid, however, I think it is so much nicer to focus on all of the delicious foods that I CAN eat.  There are more than enough plant-based recipes out there to last a lifetime, and they can be so delicious you won't ever feel like you're missing out.  I love playing around in the kitchen with new recipe ideas, and I've found that a lot of the vegan meals I have created are some of the best things I've ever cooked!  With so many tasty options, I would hardly say I am deprived.  

"Big bowls," as I like to call them, are one of my favorite easy meals to make.  These basically consist of a bunch of my favorite healthy foods thrown together in a giant bowl and topped with some kind of yummy sauce.  To keep things balanced, I always choose a combination of grains, proteins, healthy fats, and, of course, tons of veggies.  When I think of all the delicious things that I CAN have, the possibilities for these bowls are endless.  And my favorite part is, I almost never end up with the same meal twice!

Below are some ingredient ideas to get you started:

Grains:
Brown rice
Couscous
Quinoa
Millet
Whole grain pasta

Protein:
Black beans (we make a big batch on Sundays for the week)
Pinto, Great Northern, or any other kind of bean
Chick peas
Lentils
Tofu or tempeh (so good marinated and roasted in the oven)
Fried cage-free egg
Organic meat
Fish or shrimp

Veggies (I love them roasted in the oven with EVOO and sea salt or sautéed):
Cubed potatoes (sweet potatoes are my fav)
Cauliflower
Broccoli
Brussels sprouts
Squash or zucchini
Eggplant
Tomatoes
Beets
Peppers
Onions
Carrots
Peas
Corn
Spinach, kale, or other greens (sautéed with EVOO, garlic, and lemon is the best!)
Garlic
Avocado
Jalapenos 

Sauces/toppings:
Braggs liquid aminos (tastes like soy sauce but much better for you...this stuff tastes good on EVERYTHING)
Sriracha hot sauce (tastes amazing in combination with the Braggs)
Tabasco or other hot sauce
Coconut oil (great alternative to butter)
Dijon mustard
Lemon or lime juice
Salsa
Organic salad dressing
Nutritional yeast (adds cheesy flavor)
Of course, it helps to keep in mind that some combinations work better together than others, but in my experience it is pretty hard to screw it up!

Tuesday, August 13, 2013

DIY Laundry Soap

In an effort to rid our home of unnecessary chemicals and pesticides, I've been trying to switch to as many natural and homemade products as I can.  While everything in our house still isn't 100% green, we have definitely moved in the right direction.  Every little bit helps!

Research has shown that when multiple pesticides and herbicides are used in conjunction with one another, they produce a "cocktail effect."  These substances may have proved to be harmless when studied at low doses in a lab INDIVIDUALLY, but when combined together their effect is quite toxic.  So, the more unnatural substances we can get rid of, the weaker this "cocktail effect" will be.

Luckily we now have Pinterest to provide us with a never ending supply of natural cleaning remedies (seriously, what did we ever do before this site?!).  Thanks to many informative pins, I am now utilizing vinegar, baking soda, hydrogen peroxide, and lemons much more in my day-to-day cleaning routine.  I also can't get enough of the all-natural and reasonably priced Mrs. Meyer's line.  It's the best!

While it was easy for me to start wiping down counters with natural all-purpose cleaner instead of bleach spray, and scrubbing sinks with baking soda instead of Comet, I was pretty hesitant when it came to changing my laundry soap.  I like to workout and get sweaty, and I couldn't imagine anything homemade would work as well as a commercial detergent.  Plus, I wasn't too familiar with the necessary ingredients and didn't feel like driving all over the place trying to track them down.

Jay of course wanted to give it a try, so I did a bit more research and decided to attempt the most basic recipe I could find that still received positive feedback.  Pretty much all of the natural laundry soap recipes on the web involve some combination of the following: Borax, Fels-Naptha or Ivory soap, and washing soda (NOT baking soda).  There are other things you can add to doctor it up, but I was set on keeping it as simple as possible.  I had read that all three of these essential ingredients could be found at Wal-Mart (sadly, not Target), so, as much as I absolutely loathe the place, I stopped in and picked up the supplies.

I started by grating the bar of Fels-Naptha soap into a bucket with a cheese grater.  It's yellow, so it actually looks just like a pile of cheese when you're done...yummy!  This step was the most annoying part by far.  I've heard of people doing it more quickly in their food processors, but I didn't feel like dirtying up a bunch of equipment.  Then, I added 2 cups of the washing soda and 2 cups of the Borax and shook it up.
Finally, I poured it in to a prettier container...it looks so much nicer on our shelf than a bottle of Tide!


I waited until our old detergent was out to give it a try.  Shortly after I had used the last drop of the store-bought stuff, this handsome guy came down with a serious eye infection that resulted in some icky red discharge spots on our comforter.  (It turns out that he has something called detached retina syndrome, and if we hadn't taken him in to the vet when we did he would have gone blind! Yikes!!)

Anyways, all I had on hand was the new homemade soap, so I figured it would be a good test to see if it really worked.  Sure enough, the duvet cover smelled great when it came out, and there were no stains left to be found.  I have done a couple more loads of laundry since then, and I honestly have no complaints so far.  The stuff works great (and it is safe for HE washers), not to mention it is WAY cheaper and less toxic than regular detergents.  I'm sold!

Sunday, August 11, 2013

Kombucha: The Elixer of Life

Since Jay and I both work in education, we are SO fortunate to have the summers off.  Aside from wheat grass growing, we have picked up numerous other hobbies this summer that may or may not last into the school year (when our free time is diminished by 1000%).  There is one thing, however, that I genuinely believe we can stick with, and that is making our own Kombucha.  It is truly the easiest thing ever and so much cheaper than buying from a store.

For those of you that are unfamiliar with Kombucha, it is an ancient Chinese brew made by fermenting tea with a live culture of yeast and bacteria.  If you think it sounds gross, it's because it sort of is.  It has become super trendy and popular in recent years not because of it's amazing taste (it's kind of sour and vinagar-y) or ingredients, but because it is known to be the "elixer of life."  The Chinese have been making it since 221 B.C., and it is said to increase energy, detoxify the liver, strengthen kidney function, prevent cancer, and balance the body's PH levels, among other things.  

Although there have not been any scientific research studies performed on humans, Jay and I figured that if it has been around for over 2000 years, there must be something to it.  But if you've seen Kombucha on the shelves at Whole Foods, you know that the stuff is not cheap.  It generally costs around $3-5 for a single serving!  I had heard of people making their own Kombucha before, but the fermenting process sounded complicated and I just assumed it would be too hard or time consuming.

Jay really wanted to take a stab at making his own, so he ordered a Kombucha starter kit from Amazon just to see how it all worked.  The main reason the kit is helpful is that it comes with detailed instructions and a "kombucha mother" or "SCOBY."  That's the slimy yeasty bacteria disc that fuels the whole process.  Once you have a SCOBY (we call them "SCOBY snacks" at our house), all you have to do is boil a large batch of tea, add sugar, and allow it to cool to room temperature.  Then you add the SCOBY, cover the container with a cloth to keep bugs out, and wait for your Kombucha to brew.  The longer you wait, the more sour it will become, as the fermentation process eats up the sugar.  While the Kombucha brews, a new SCOBY will form on top that you can later share with family and friends so that they too can make their own Kombucha!

The instructions that came with the starter kit were very straightforward, and we had our first batch brewing in no time.  We were told to store the Kombucha in a warm environment while it brews (80-85 degrees).  We usually keep our house around 78, so I figured that would be close enough.  Sadly, our first batch started to grow mold (despite the fact that mold on Kombucha is very rare).  Even though it is normal for the SCOBY that forms to look white and slimy, we felt pretty certain that the whitish green fuzzy stuff on our batch was mold and not typical growth. 

 The folks at Oregon Kombucha were nice enough to send us a new SCOBY, and we tried again.  This time, we used a 1 gallon Ball jar as our brew container rather than a crock pot (less surface area exposed) and stored the brew in the toastiest place in our house: the electronics closest.  We were confident that the hum of the Playstation would keep the Kombucha nice and cozy.  
Our second attempt was successful, and after around 10 days we had Kombucha that actually didn't taste half bad!  Since we hadn't let it sit too long, it wasn't overly sour or bitter.  And a beautiful new SCOBY snack formed on top that we will be happy to share!
We bottled our Kombucha in some plastic PET bottles that Jay had on hand from an old beer-brewing kit, and they are currently sitting at room temperature for the next 24 hours to increase carbonation.  Then we will stick them in the fridge and they will be ready to drink!
This batch actually tastes pretty palatable, but we may try adding in some fresh fruit juices, herbs, or spices next time before bottling, just to kick it up a notch. 

Once you get the hang of it, the Kombucha brewing process really doesn't take much more effort than brewing a batch of regular tea.  And it costs just pennies per serving!  We look forward to enjoying this miracle health beverage for years to come!

Thursday, August 8, 2013

The Wheat Grass Miracle

A little while back, my mom came home with a tray of fresh wheat grass that she found at the local farmers market.  The owner of the booth, Jon Faulconer, had told her all about the fantastic health benefits of wheat grass, and my mom was super excited to pass along the information to Jay and me.  Apparently wheat grass has all of the following magic powers:
  • potent detoxifier
  • high in multiple different enzymes
  • improves digestion
  • is a complete protein (20% protein)
  • restores alkalinity to the blood and cleanses and builds the blood
  • clears skin and reduces body odor
  • helps treatments and prevents cancer
  • helps with weight loss
  • increases energy levels
  • slows down the aging process
  • improves blood sugar disorders
Needless to say, we were impressed!  I always knew wheat grass was supposed to be good for you, but I had no idea it could do all that!  

We started looking into the best ways to juice the grass, and we were disappointed to learn that you cannot effectively juice wheat grass in a regular electric juicer.  Rather, you have to use a masticating juicer (most of which involve cranking by hand).  All of the ones I was finding online were around $100, so I was about ready to give up on our new hobby.  But then I stumbled across this find on Amazon for under $40 bucks with great reviews!  Score!

It has worked great for us so far, but it does take a bit of time and effort.  Since we knew that realistically there was no way we would pull this juicer out and go through the process everyday, we decided to grow big trays of grass at a time, juice them all at once, and save the extra shots in ice cube trays in the freezer.  Then, whenever we want a wheat grass shot, we just defrost a cube and it's ready to go!

Our system has been working great so far.  Jay even built a special shelf in front of the window in our garage that allows him to keep three trays of seeds at different stages in rotation at all times. He's been buying the seeds on Amazon and also invested in an "easy sprouter" to get them going and some special liquid kelp organic seaweed fertilizer.  Needless to say, he is way into wheat grass!  

If you are interested in learning more about the process, here is a good how-to video that goes into more detail. 

Cheers to chlorophyll!

Wednesday, August 7, 2013

A Running Workout

I generally consider myself to be a fit and active person, but running is something that has never come easy for me.  For years I would go for walk/jogs without ever seeing much improvement in my stamina.  I couldn't seem to consistently run more than a few minutes without stopping regardless of how much I trained. 

Finally, around three years ago, I was able to bust through that wall.  It all started when Jay woke up one day and, out of the blue, announced that he was going to run a half marathon.  Despite not ever being much of a runner before, he planned his workouts and completed each one without complaint.  He never stressed over the distances or doubted himself, he just did it.  

At that point I realized that running is just as much of a mental challenge as it is a physical one.  I decided that, if Jay could run five, six, seven plus miles without a gripe, I could at least run with him for the first two.  I was able to genuinely convince myself that it would be easy, and because of that I successfully ran those two miles without stopping.  Once I finally felt the confidence I had lacked before, I continued to add miles and go farther.  The next year Jay and I completed the half together, and we have stuck with running ever since (although he still kicks my butt).  I still find running difficult and am not fast by any means, but I am now able to enjoy the challenge and the sense of accomplishment that comes with completing a good run. 

After two big surgeries earlier this summer, I've had to start back at square one when it comes to exercising.  I am still slowly building my running stamina back up, and I've found that interval workouts are a great way to push myself while still allowing for some walking recovery time.

Below is a quick treadmill interval workout that I put together for days when it is too hot to run outside (which has been all of them lately).  It would be easy to increase or decrease the speeds to match any ability level. 
Happy running!

Tuesday, August 6, 2013

Eating Vegan...Sort Of

I truly believe that food is one of the most powerful forms of medicine there is.  Studies show that a plant-based diet is the best defense against diseases like diabetes, heart disease, and cancer.

In my own efforts to fight cancer and live a healthy lifestyle, I try to eat a mostly vegan diet.  I limit animal products, processed foods, added sugars, and white flour while focusing on lots of veggies, fruits, beans, and nuts. 

 I say that I eat "vegan-ish" rather than labeling myself as an all-out vegan, because I certainly don't follow the hard-and-fast rules of the diet.  I do eat dairy, meat, eggs, and seafood in moderation (choosing organic, grass-fed, cage-free, etc. when possible), and I can't resist a good dessert!  Plus, I think it's important to enjoy meals with friends and family without overly worrying about which foods they will serve or restaurant they will choose.  I do the best I can 90 percent of the time and try not to worry too much about the rest!  You have to be somewhat flexible in life!

That being said, the majority of the recipes I will share on the blog will be vegan.  You can count on them to be quick and easy, as well, given that school is about to start and I will be a full-time working girl again. 

Since summer in Oklahoma is hotter than all get out, I have been loving recipes that don't involve turning on the oven.  One that I've made a few times recently is couscous salad.  I roughly follow the recipe below but mix it up depending on what I have on hand.

Summer couscous salad

Combine:
2 cups cooked whole wheat couscous
1 cup chopped cucumber
1 cup chopped tomatoes
1/2 cup chopped red onion
1 cup canned garbanzo beans, drained
Fresh mint, basil, dill, oregano, or whatever you have on hand, chopped

For the dressing wisk together:
Juice of two large lemons
1/2 cup olive oil 
2 cloves garlic, minced
1 tsp Dijon mustard (or more, depending on your taste)
1 tsp salt
Dash pepper to taste
It would also be great with corn, bell pepper, black beans, avocado, goat/feta cheese...the possibilities are endless!

If you are interested in learning more about the why behind plant-based eating, I highly suggest the documentary "Forks Over Knives" (available on Netflix streaming!) and the book "Anticancer: A New Way of Life" by Dr. David Servan-Schreiber.  Both are full of fascinating food and health related research, and I cannot recommend them enough!